Wavepad Sound Editor Review– Is it the best audio editing software?

Wavepad sound editor is an audio editing software which can be used for editing your audio files, recording new audios, converting the audio files to other formats, converting the text into speech and many more things which you like to perform on your favorite music files. With its unique set of features, Wavepad stands apart from other audio editing software available in the market.
The reason why I chose Wavepad audio editor is I was able to find a large number of positive reviews which rated the software as an excellent one. I downloaded the trial version of the software to check if it is really worth the review and can suit my needs.
Now after using it for some time, I would definitely tell that it is a best audio editing software in terms of the features it offers and an easy user interface. There is a tutorial for every action that you are going to perform with the software which can really help a non techie person in making the best use of the software.
How simple is the installation process?
Just like the installation of Switch sound file converter which we have discussed earlier, the installation of Wavepad is also very simple and a 2 step process. After downloading the software, you just need to click on the setup file and agree to their terms and conditions. Now the software is installed and you are ready to use it.
Wavepad Sound Editor Features
As said earlier, Wavepad comes with a lot of useful features that can make your audio editing experience a simple and a hassle free one. Let’s discuss about these features in detail.
You can cut, join or split your audio files by making use of the trim, join and split features available in the software. This feature can help you in cutting and joining multiple audio files.
Batch convert feature allows you to convert a large number of audio files into a desired format at once and thereby saving a lot of time.
Similarly batch join feature enables the user to create a single audio file by combining a number of separate audio files.
Convert text to speech feature converts the text written in the text editor into an audio speech. You can also check the converted speech and edit it.
Unlike other audio editing software, Wavepad audio editor supports a large number of audio and music formats. Some of the formats supported by the software are MP3, WAV, VOX, GSM, WMA, AU, AIF, FLA, RA, OGG, AAC, M4A, MID, AMR.
Audio tag feature allows you to edit the information of an audio file while helps in searching and bookmarking the file.
Other editing features like fade in/out, equalize, amplify, normalizer and reverse can help in changing the effects of the audio file.
Recording feature allows you to record your voice or other sound using a microphone connected to your PC. You can then edit the recorded sound as per your needs. I tried recording an audio and it was very clear and the noise level was also very low.
Speed feature allows you to change the speed at which the audio plays.
The software also provides features that can help in reducing the noise present in an audio file and making the audio more clear to listen.
Click here to Download Wavepad Sound Editor
Does Wavepad ‘s interface is user friendly?
Wavepad sound editor comes with a simple and an easy to use interface that even a newbie user can get to use the software in an efficient manner. All the features and the options of the software are arranged and displayed in a simple manner and thereby eliminates the need to navigate through various screens to access the features of the software. Now let’s discuss in detail on how to make the best use of the software.
Once you open the software, you can see a window on the left side with various sections which contains video tutorials and a step by step guide on how to use the various features of the software. You can click on these video tutorials and the links present under the quick start wizard to learn about the software.

Open and edit an audio file:
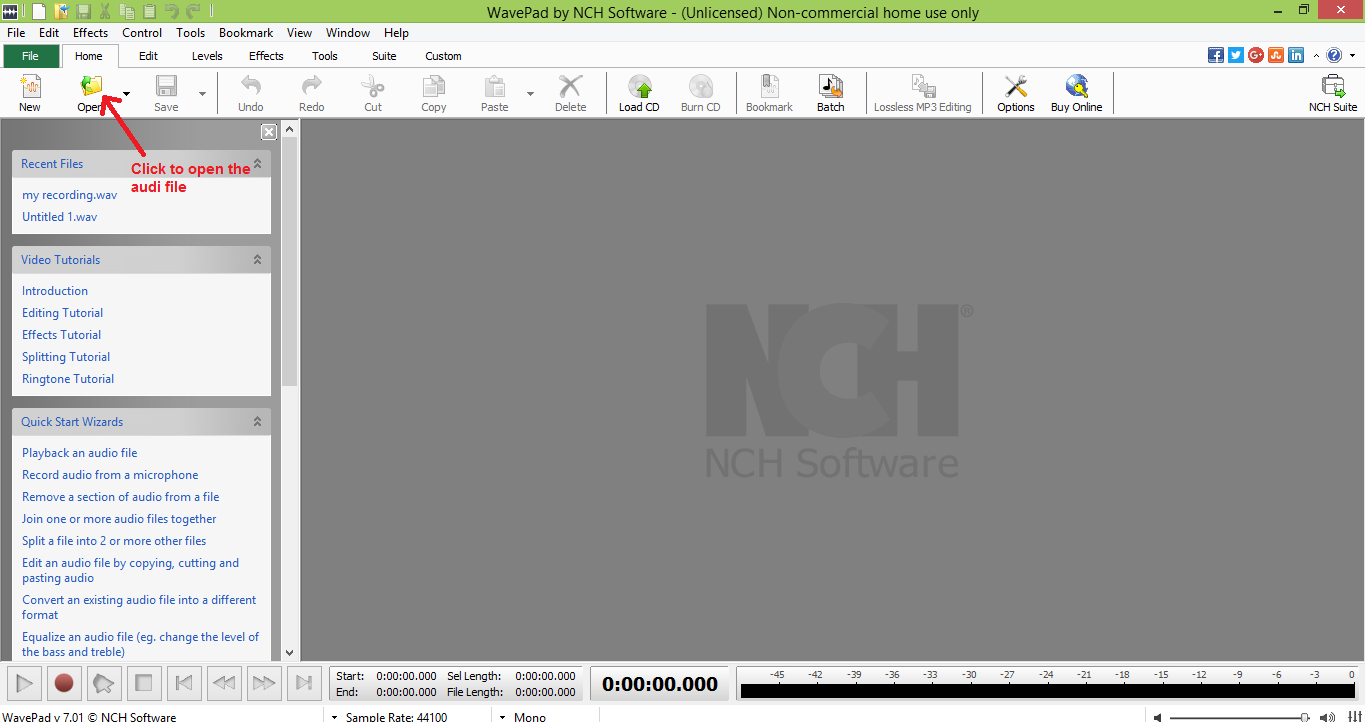
Click on the open button under the home tab to open an audio file that you want to edit.
Now you can edit the audio file as per your wish. If you want to cut or copy a part of the audio file, then place the cursor from where you want to cut the file and from there drag the cursor sideward till where you want to cut the file. Then click on the cut button.
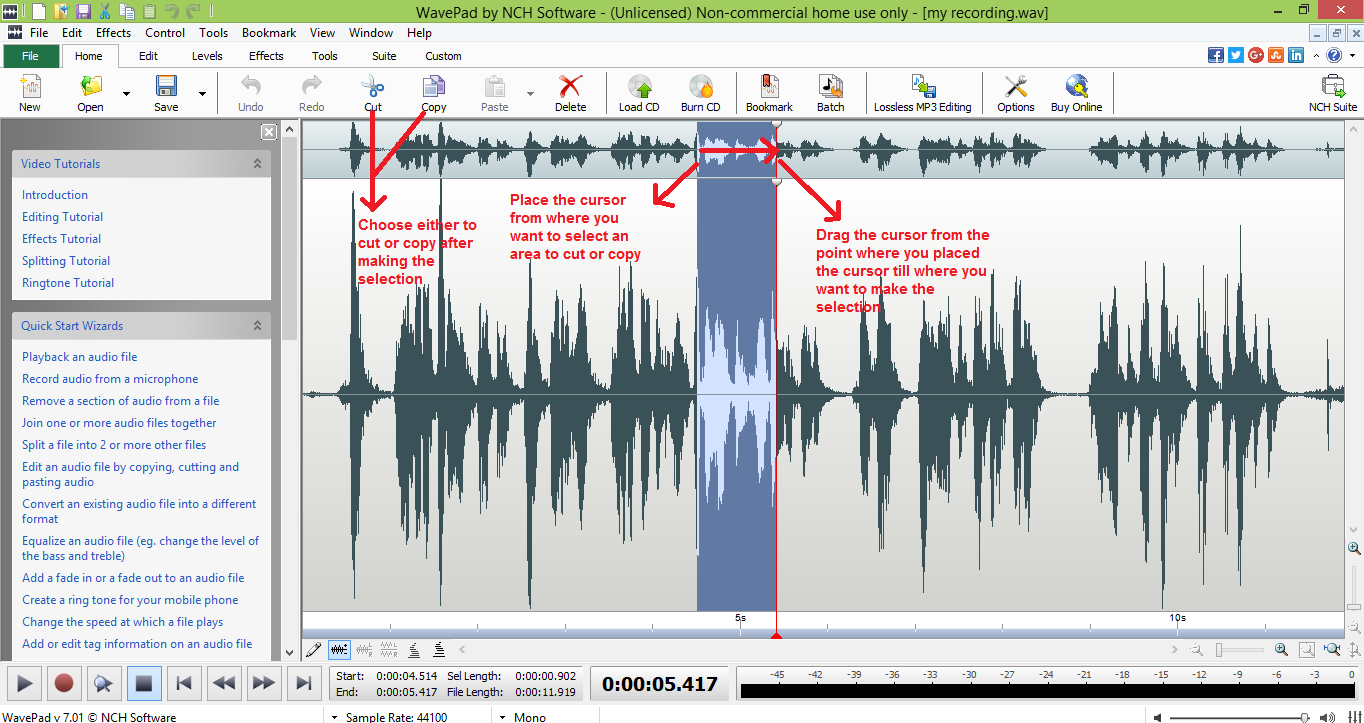
Once you have cut or copied a portion of the audio, then you can paste it at whichever place you want just by placing the cursor at the particular point.

In a similar fashion, you can also delete a part of your audio file by selecting the intended portion like you did while cutting and then click on the delete button.

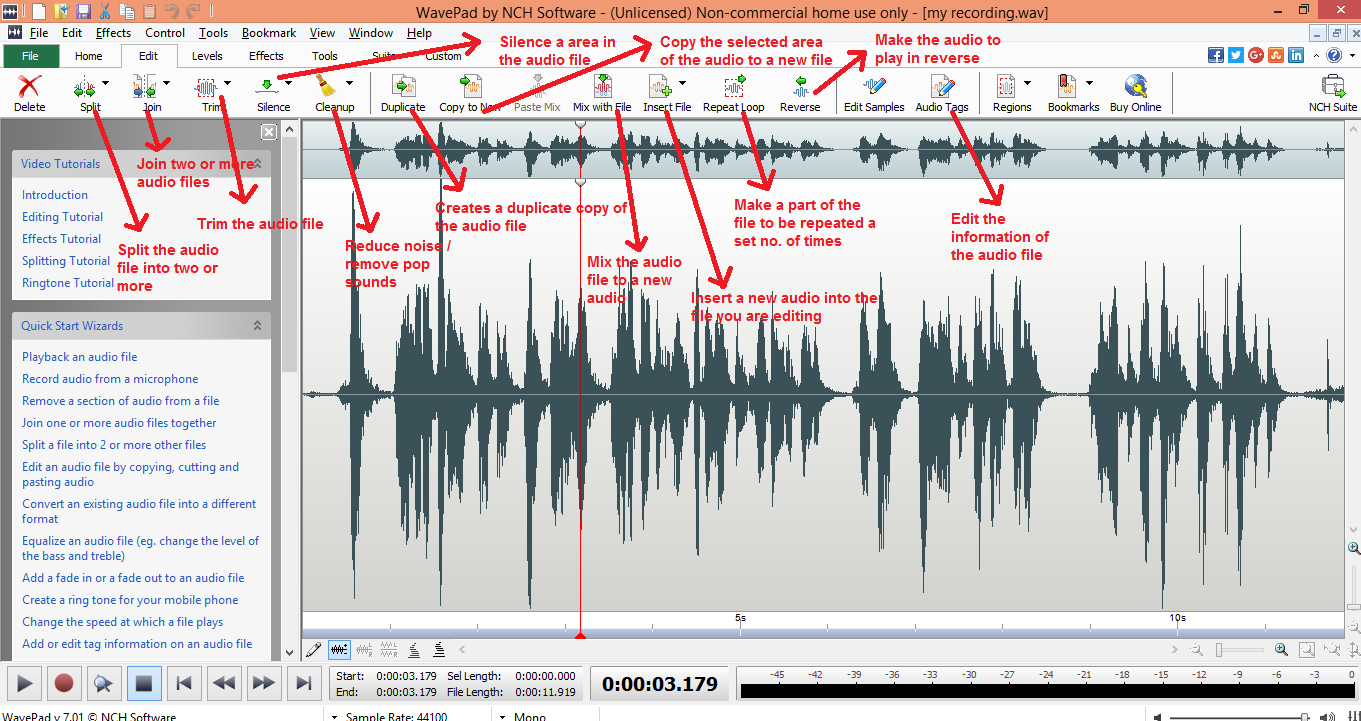
Under the edit tab, you will see a lot of edit options which you can make use of for editing your audio file.
Split – Allows you to split the audio file into various pieces
Join – Allows you to join two or more audio files.
Trim – Trims your audio file as per your need.
Silence – You can silence a particular area in your audio file by using this silence button.
Cleanup – Enables the user to reduce the noise present in the audio file. It also helps in removing any click/pop sounds present in the audio.
Duplicate – Creates a duplicate copy of the audio file.
Copy to New – Copies the selected portion of the audio file into a new audio file.
Mix with file – You can open another audio file and mix it with the file which you are currently working on.
Insert file – You can insert other audio files into the working file by placing the cursor at the intended position.
Repeat loop – You can select a portion of your audio file to be repeated any number of times that you wish.
Reverse – Reverses the selected portion of the audio file and the selected part alone will be played in the reverse order.
Audio tags – You can edit the information of the audio file by making use of this button.
Under the Levels tab, you will be finding a lot of options for changing the sound levels of the audio file.
Amplify – You can increase the volume level of the selected area of the audio file.
Normalize – You can adjust the loudest part of your audio file to a desired value.
Compress – You can adjust the output volume level based on the input volume.
Audio gain control – Adjust the sound level of the audio file in such a manner it is consistent throughout the audio.
Equalize – For changing the bass and treble levels of the audio file.
Fade – You can fade in or fade out a portion of the audio file.
Envelope and Stereo pan – Allows you to change the volume of the audio over a time. Like you can set a maximum volume at the center and a minimum volume at the end of the audio.

Under the effects tab, you can see various options for adding some effects like echo or vibration into the audio file.
Special FX – Allows you to add various effects to your audio file. Some of the effects that can be added to the audio file are echo, reverb, Doppler, vibration etc.
Speed – You can change the speed at which the audio plays. You can either reduce or increase the speed.
Voice – You can make changes to the voice present in the audio file.

So using the options present in these three tabs, you can make various changes to your audio file. Once you are done with your editing, you can now save the file by clicking on the save button present under the home tab.

You can also open the audio file present in a CD by using the Load CD button and burn the edited audio file into a CD by using the Burn CD button.

Batch conversion:
As said earlier one of the main feature of the Wavepad sound editor is batch conversion which allows you to convert a bulk of audio files into other formats at once. Follow the below steps for batch converting the audio files.
Click on the batch converter button available under the Tools tab and a batch converter window will open.

Now select the audio files or the folder which contains the audio files by clicking on the Add File or Add Folder button.

After selecting the files or folder, click on the next button to proceed further. You can also remove any file if you wish by using the remove button.

Now again click next in the step 2 without performing any action.

In the step 3, select the output format to which you want to convert the input audio file and the output folder where you wish to save the converted files. Now initiate the conversion process by clicking on the next button.

That’s it the files are converted into the specified format and saved in the selected folder.
Convert text to speech:
Another notable feature of Wavepad sound editor is the text to speech converter which allows you to convert a text written in a text editor into an audio speech.
Click the text to speech button available under the tools tab to open to text to speech converter window.

Now write the text which you want to convert to speech in the text editor area and then click on the Synthesize speech button.

The text is now converted into a speech and opened in a window which you can listen by clicking on the play button available at the left bottom of the screen.

You can also perform editing to the speech audio using the various edit options available and once you are done, you can save the audio by clicking on the save button.
Create a ringtone for your mobile:
You can also create a ringtone for your mobile phones by using the Wavepad’s Create ringtone feature present under the tools tab. Once you click the create ringtone button, a window like below will open.

Now select the mobile phone type (iPhone / Android) for which you want to create a ringtone and then click next.

Give the email address that you use in your mobile so that the ringtone will be delivered to that email as an attachment and thereby saving the time that you use to transfer the file manually.

You will be getting a popup message like below asking for your permission to send the ringtone to the email specified in the previous step. So click on the allow button if you wish to receive the ringtone in your mail otherwise click the deny button.

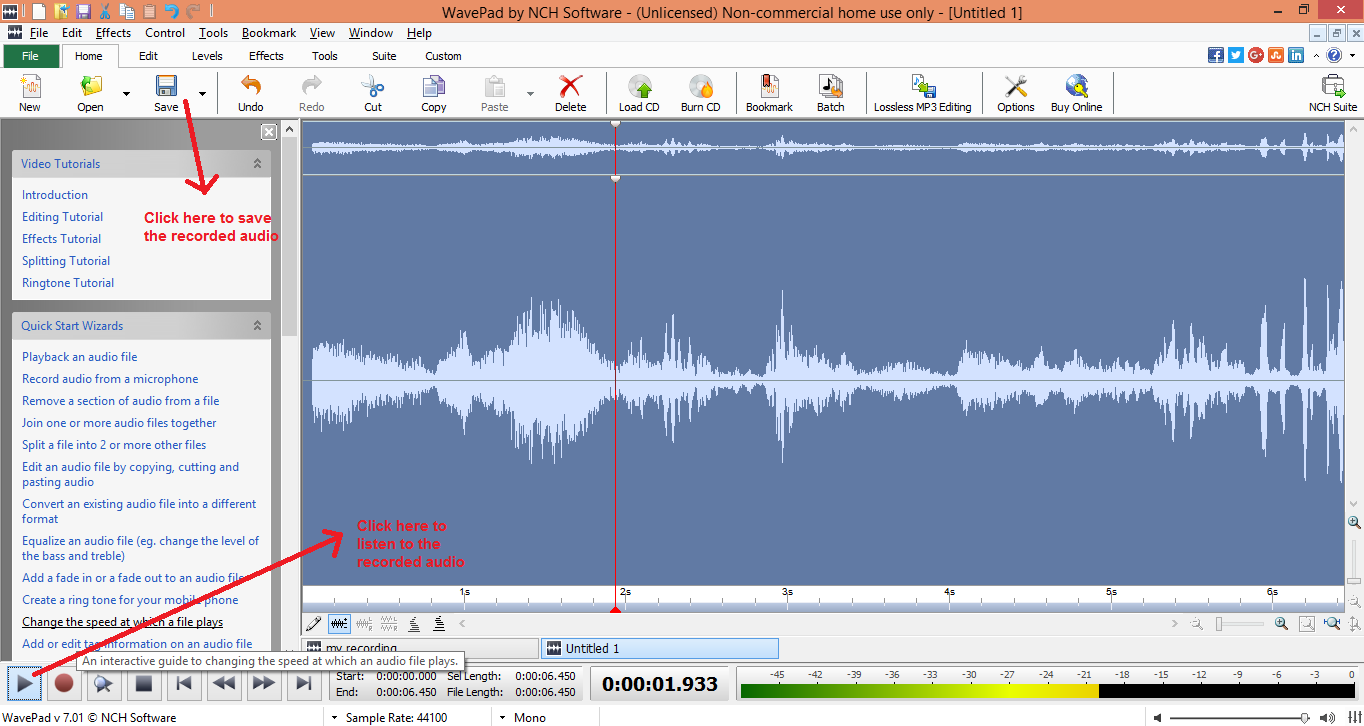
Recording audio using a microphone:
You can also record your own voice or any audio on Wavepad by simply clicking the record button present at the bottom of the screen.
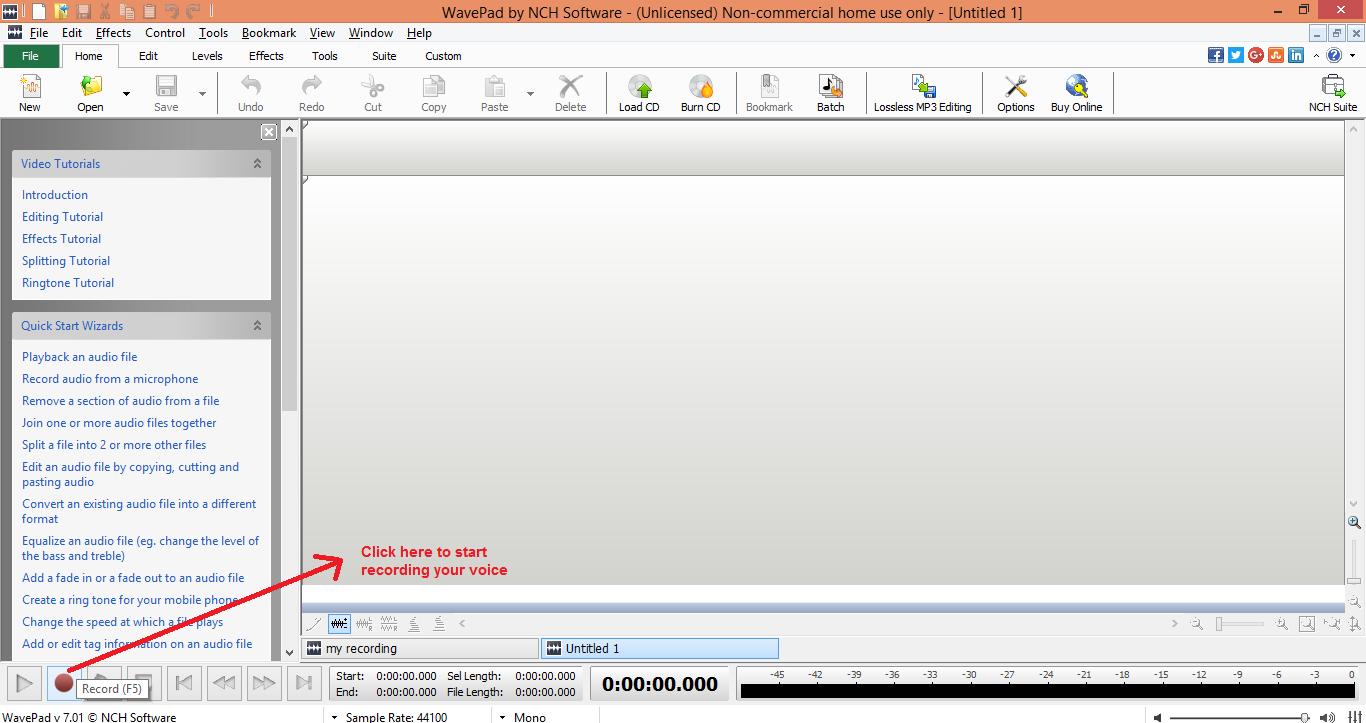
Once you are done with the recording, you can stop it at any time by clicking on the stop recording button.

You can listen to the recording and do changes to the recorded audio file and then save it by clicking the save button.
What is the word of mouth from the users who have used Wavepad?
Almost all the reviews that I went through on Wavepad audio editor were positive and I barely found any negative review about the software. Some even declared it as the best audio editing software available in the market considering the features it offers to the user.
Almost all the users except a very few who have used or using the software has a positive word for the software. The common concern that was expressed by a very few users were regarding the trial version of the software. The complaint which they make is they were not able to make full use of the software after the end of the trial period. And there is no proper notification about when the trial version ends. Apart from this trial version, there are no specific complaints or problems that the users have to say about the software.
What are the limitations in the trial version of the software?
I have been using this software for a week now and I have not found any limitations with the Wavepad Sound Editor trial version and I am able to make full use of the software. But most of the reviews and users have stated that the trial version is limited to 14 days and after that you cannot use the full features of the software. Most of the features will be locked and also you cannot save the file.
So you need to purchase the full version once the trial period ends after 14 days which is touted to be the only limitation. Will try to confirm and update soon that the 14 day trial period claimed by many users is really true.
| Windows OS | Windows 10, 8.1, 8, 7, Vista, XP |
| MAC OS | MAC OS X v10.5 or above |
| iPhone / iPad | iOS 6.0 or higher |
| Android | Android version 2.3.3 or higher |
How much does the Wavepad cost?
When you visit the NCH official website to buy or download Wavepad audio editor, you will be able to see two different versions of the software namely Master edition and standard edition. The main difference between the two is that while the master edition contains VST plugin support and SFX library, the standard edition does not contain them. Apart from this there is no other difference between the two editions.
While the master edition of the software is priced at $99, the standard version costs $60. There is a 30% discount on the price of the software if you buy it from their official website. But this offer is limited only for a short period of time. So please don’t miss the chance and try to grab the software if you wish to buy one in the near future.
There is also a 30 day money back guarantee available which entitles you to get full refund of your amount if you face any difficulty using the software within 30 days from purchasing. You can also get bulk discount offers if you wish to buy more than 5 different software from the NCH website. Some of their other software which may interest you are Switch sound file converter, VideoPad video editor, Voxal live voice changer, Zulu virtual DJ software etc.
Verdict & conclusion on the software:
So the work of editing your audio files is no more a difficult task with the Wavepad sound editor software which makes the editing process a simple and a smooth one. The various features of the software, an easy to use user interface and a simple user guides and support options makes it one of the best audio editors available in the market. So no matter if you are a techie or a naïve user, the software caters to the needs of all users which makes it a worthy try.


