Wondershare Filmora Video Editor – Full Review with Main Pros & Cons

Wondershare Filmora also known as Wondershare video editor is a video editing software developed by Wondershare Technology corp., a leading software application developer producing a large number of software applications for varied customers.
This review on Wondershare video editor is based on my personal experience in using the software for editing some of my videos. I will let you know in detail how easy it is to edit or make changes to your videos by making use of the software and its features.
PLUS I will share $10 Off Coupon of Wondershare on this post
How long and how simple is the installation process?
The installation of Filmora video editor is a very simple process which does not require any complex action to be performed. You just need to accept the terms and conditions and once done, the installation of the software starts. But while the process is very simple, the time taken for the process to complete is very high.
It nearly took 30 minutes for the installation to complete in my PC which seems to be very long compared to other software that I had tested in recent times. Apart from the time consuming process, I cannot see any other difficulty associated with the software installation.
What are the features of Wondershare Filmora?
A good video editing software is a one which can help the user in editing the videos in a simple but an effective manner. And for this the software must come with a good number of features and tools that can help the process a simplified one. In that way, Wondershare Filmora comes with a lot of good features which can help even a novice user to use the software effectively.
The software comes with 8 different editing tracks which makes it possible to work on multiple videos at a time.
There are more than 650 effects and transitions available that can be added to your video to make it more attractive.
The text/Credit feature allows you to add text or caption to the videos.
There are over 10 different output video formats available to which you can export your edited videos. You can also export videos to a format that are supported by android and iOS devices. The video formats that the software supports are WMV, MP4, AVI, MOV, FLV, MKV, TS, 3GP, MPEG-2 and WEBM.
Another notable feature that wondershare filmora offers is that you can share your edited video to social networking sites like YouTube, Facebook and Vimeo.
The burn DVD feature helps in creating a DVD video and burns it to a DVD disc.
The action cam tool feature allows you to edit the videos captured using a webcam.
The instant cutter feature allows you to trim the video or merge more video files.
Easy mode feature on Wondershare filmora allows you to quickly edit your videos by applying themes and music to the video and thereby saving your time and effort that is spent while editing the videos manually.
The record feature allows you to record a webcam video, a voiceover or your PC screen.
Filmora Video Demo
Click Here to Download Wondershare Filmora for Mac & Win
Buy Filmora for Windows With $10 Off Coupon
Buy Filmora for Mac With $10 Off Coupon
How simple is the user interface of Wondershare video editor?
Wondershare Filmora comes with a simple and an easy to use interface and thereby making it easy even for a user without much technical knowledge to edit their videos. So the software does not require you to be a technically sound person in order to use it. Now let’s discuss in detail about the working of the software.
A screen like below appears as soon as you click open the software in your PC. The screen contains four different options which the user can choose according to their needs : The action cam tool, instant cutter, the easy mode, and the full feature mode allows you to access all the complex features and tools the software offers.

Please note that there is an option available for choosing 16:9 and 4:3 at the top of the screen. It is nothing but the video aspect ratio in which the edited videos will be created. So it is advised that you choose any one of this option before you proceed with the editing.
Action Cam tool:
Once the action cam tool is opened, you need to select the action cam video which you want to edit by clicking the Import an Action Cam Video button present at the bottom of the window.
There are three tabs present at the left side of the window. The fix tab contains options for making changes to visuals present in the video like zooming in and out, rotating the object present in the video, reducing the noise level of the audio and adjusting the clarity level of the video. Lens correction, stabilization and Audio denoise are the three options which performs the functions stated above.

The speed tab contains options for increasing the speed of the video in selected areas and freezing a particular portion of the video.
First choose the area of the video where you want to increase or decrease the speed. For this, place the cursor from where you wish to increase the speed and then click on the ‘Add marker’ button below the Speed option. Now a box appears in the selected area which you can drag to select more part of the video.

Now a box appears in the selected area which you can drag to select more part of the video. After making the selection, click on the speed check box and increase or decrease the speed at which you want the selected portion of the video to be played.

You can also replay a portion of the video by checking the replay checkbox and selecting the number of times you wish the video has to be replayed. While replaying, there is also an additional reverse play option which allows the video to be played in the reversed order till the point from where the video has to be replayed. For this you need to check the reverse option checkbox.

The Freeze frame option allows you to freeze any point of your video for a stated time period. For this select the place where you want to freeze by placing the cursor and then click on the Add button. Then select the time duration for which the video has to be freeze. Then you need to select when the freeze portion has to be played either before or after freezing.

The color tab contains various options for adjusting the color of the video.

Once you are done with the editing, you can save the video by clicking on the export button present at the right bottom of the window.

Now select the file name, location, format, resolution and frame rate of the video to be saved and then click ok.

Instant Cutter:
As said earlier you can trim or merge video files on Wondershare filmora by using the Instant cutter feature. First select the video that has to be trimmed by clicking on the Open file button

Now select the portion of the video which you want to trim by making use of the drag button present at both the sides of the storyboard. Once you’re done, click on the export button to save the trimmed video.

For merging videos, select the ‘Merge’ tab at the top, click on the open button to select the videos which you want to merge and then click on the export button to save the merged video.

Easy Mode:
As said earlier the easy mode on wondershare filmora allows you to edit the video by adding predefined themes and music without doing any complex changes. This mode is well suited for those who do not have much knowledge about editing. I personally observed that this Easy mode and Action Cam tool features are not present in other video editing software that I tried earlier.
Open the video which you want to edit by clicking on the ‘Import Media Files here’ button.

Now select the theme which you want to apply to the video from the Select theme tab and then click next. It may take some as the selected theme has to be downloaded first before it can be applied.

Now select the music which you wish to play in the video. You can select a music which is available there or you can also choose a one from your computer. Click on the next button after selecting the music.

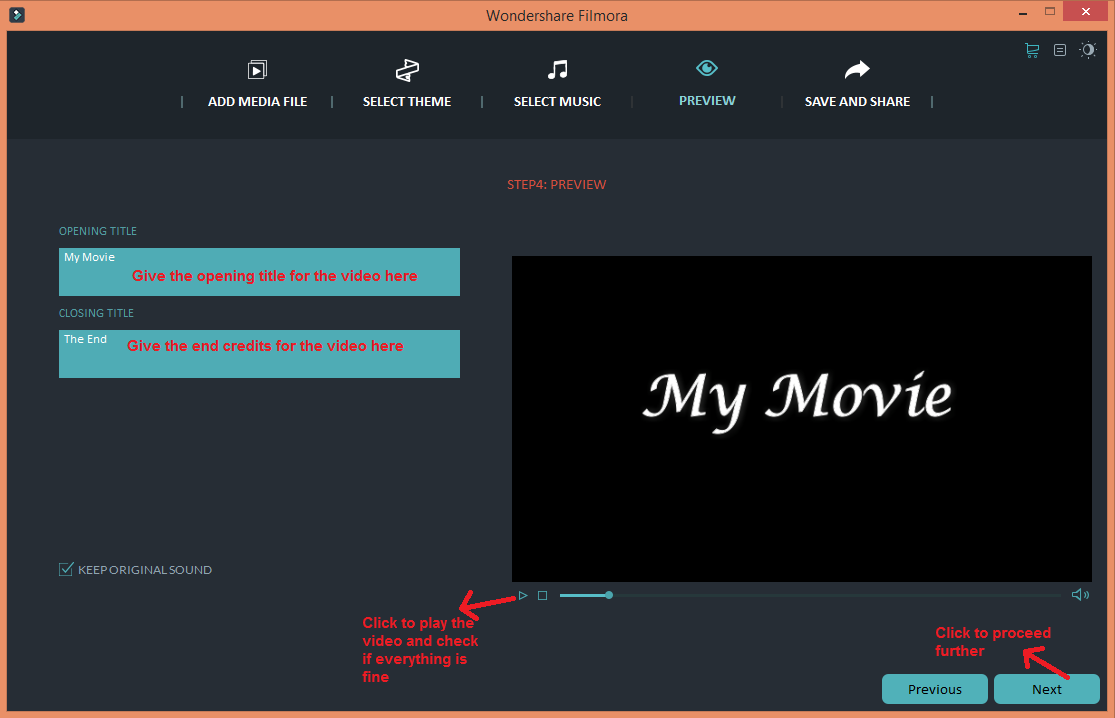
You can now playback the edited video and check if it is fine and then click on the next button to proceed further. You can also give an opening and closing title to the video by making use of the opening and closing title text box.
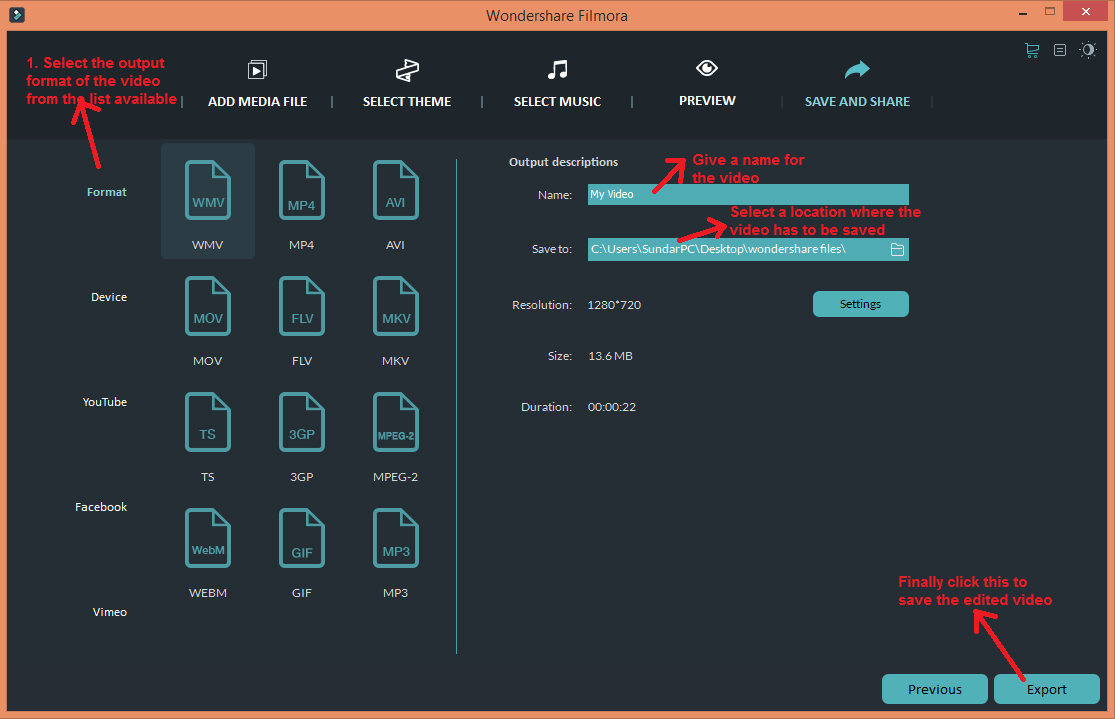
Now select the format to which you wish to save the edited video and provide the name and location to be saved. Then click on the export button to save the edited video.
Full Feature mode:
This is the mode where you will be able to access the full features of wondershare filmora and edit your videos more professionally.
Open the video / videos that have to be edited by clicking the ‘Import Media Files here’ button.

Now drag and drop the videos which you wish to edit into the storyboard.

You can change the speed and color of the video by clicking the edit button present in the storyboard.

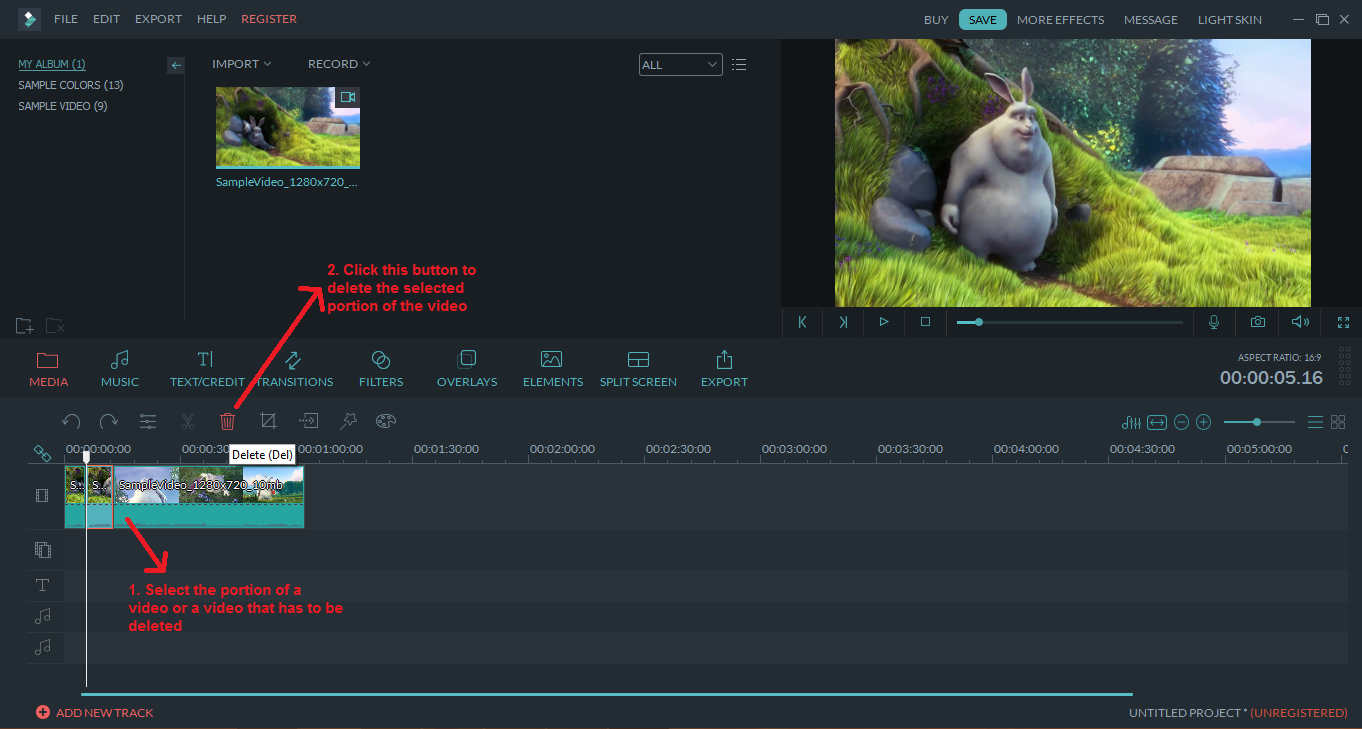
You can also cut a portion of the video by placing the cursor from where you wish to cut and click on the cut button.

You can also delete videos or a split portion from the storyboard by using the delete button.
The Crop button allows you to crop the visuals present in the video and the video now plays with the cropped visuals.

Any part of the video can be paused and flashed for a particular time period by making use of the Flash and Hold button.

The power tool enables you to blur, apply mosaic and face off a particular object present in the video. For example in my case the tilted portion alone appears clear and the remaining object is blurred.

The advanced color tuning contains advanced options for adjusting the color of the video. This is suitable for professional video editors.

The music tab contains various music files that can be added to the video. You can also add your music files from your computer by clicking on the Import media files here button present in the My Music folder.

Now drag and drop the music file into the storyboard area where you wish the music to be played.

Using the text/ credit tab allows you to add text to the video in different styles and fashions that are available there. Now drag and drop the text style from the list available into the storyboard.

You can edit the text by clicking on the advanced text edit button present in the edit track. Here you can find different options for choosing the text style, font and adjust the time duration for which you want the text to appear in the video.

There are over 650 transitions available from which you can choose the one which you like and place it in the storyboard wherever you want.
![]()
Filters tab consists of a long list of filters that can be applied to the video. You need to drag and drop the selected filter into the storyboard area where you want the filter to appear. A filter is a kind of visual effects that appears in the video.

The overlays tab allows you to choose from a wide range of overlays which you wish to add to the video. Adding overlays makes your video looks more attractive.

Elements tab allows you to add various elements to your video. Double clicking on the added element in the storyboard allows you to choose the way the element appears in the video like popping up from bottom or top etc.

Split screen option allows you to split the screen into 2 or more areas and then add an image or video to each of the split area. First select the split screen and then drag and drop in the storyboard area where you want the split screen to appear.

Now add images or videos to the 2 drop zone by drag and drop and then click ok.

So after completing the editing process, the video can now be saved by clicking on the export tab.

Now select the output format of the edited video, name and the location where you wish to save the video. You can change the resolution of the video by clicking the settings options. Once everything is done, click on the Export button to save the video. Please note that it may take some time for the edited video to be created and saved.
There are options available in the left side of the screen which allows you to share the edited video in social networking sites like YouTube, Facebook and Vimeo or burn it to a DVD disc inserted into your DVD drive.

You will be getting a window like below once the video is created and saved. Please click on the ‘Find target’ button to open the folder where the video is saved.

You can also record your PC screen or a webcam video with wondershare filmora by making use of the record button.

After choosing the respective record option, click the red color Rec button to start the recording.

Once done click the F9 button or stop recording button available at the bottom toolbar of your PC window. You can now save the recorded video by clicking the export button and following the steps which were mentioned earlier for saving the edited video.
What the users has to say about Filmora Video Editor?
Wondershare video editor comes with a lot of positive reviews which can be found easily by browsing the net. Also I found a lot of positive comments from the users who have used the software and the most common thing which both the reviews and the users had praised about is the simple user interface of the software which makes it a good one for both professional and a novice user.
The only negative which most of the users complained about is the large watermark present in the trial version of the software which I will discuss next. Also some reviews have stated that wondershare filmora might not be suitable for a professional video editor as it does not contain many features which I do not agree with since I was completely satisfied with the features that software offers.
Is there any limitation in the trial version?
There are a couple of limitations that the trial version of the filmora video editor places on the user. The first one is the final edited video contains a large watermark at the middle of the video as shown below in the screenshot. Though many video editor places a watermark in the trial version, the one that is present here is really big when compared to other similar software.

The second limitation in the trial version is that you can edit and save a maximum of only 10 videos using action cam tool during the trial period. Once the limit is reached you need to buy their full version in order to save the edited video.

Warning:
If you are using a trial version of the software, then please be aware if your limit of editing 10 videos using action cam tool is reached then you cannot save the video unless you purchase the full version and you will be getting this notification only at the end after you did the editing and not before you start the work. So your time is totally lost if your limit is reached and you have done the editing without knowing it.
| OS Supported | Windows 10, 8, 7 (64 bit) Mac OS X 10.9 or later |
| Required RAM | 2 GB |
| Required Space | 1 GB |
| Required Processor | 2 GHz |
What is the price of the Wondershare Filmora?
Wondershare video editor is available for both windows and Mac and both the version is available for personal and business purpose. While the price of the windows and the MAC version of the software for personal use for one year are $39.99 and $44.99 respectively, the price of both the version for lifetime license is $59.99. Similarly the price of both the versions of the software for business purpose is $119.99 for lifetime license.
Also please note that the above prices are only for 1 PC and if you need license for 2 or more PC, then the price may differ which you can check by visiting their official website. There is also a 30 day money back guarantee for all the products that you buy from them.
There is a discount of 60% available for students and teachers from educational institutions which you can get by purchasing the software from their official site. And also i found $ 10 Off special coupon that you can get Here
Verdict and Conclusion:
So with Wondershare filmora video editor, you can easily edit your large collection of videos the way you want. The availability of rich features like easy mode and action cam tool makes the software to stand apart from the competition. The price of the software is also reasonable and can be afforded by anyone who wishes to learn video editing.
Since the user interface of the software is really simple and easy, even a novice can edit their videos effectively without much learning. Except for the large watermark present in the trial version, the software does not have any major drawbacks and it is totally worth the money for both professional editors and an average users.


